STARTING SYSTEM
The battery, starting, and charging systems operate in conjunction with one another, and must be tested as a complete system. For correct starting/charging system operation, all of the components involved in these three systems must perform within specifications.
| Starting System Diagnosis | ||
| CONDITION | POSSIBLE CAUSE | CORRECTION |
| STARTER FAILS TO OPERATE. | 1. Battery discharged or faulty. | 1. Refer to Battery. Charge or replace battery, if required. |
| 2. Starting circuit wiring faulty. | 2. Refer to 8, Wiring Diagrams. Test and repair starter feed and/or control circuits, if required. | |
| 3. Starter relay faulty. | 3. The starter relay is located within the TIPM (Totally Integrated Power Module). Refer to “no crank condition” in 9 - Engine - Electrical Diagnosis. | |
| 4. Ignition switch faulty. | 4. Refer to Ignition Switch and Key Lock Cylinder. Replace ignition switch if required. | |
| 5. Clutch pedal position switch faulty. | 5. Refer to Clutch Pedal Position Switch. | |
| 6. Park/Neutral position switch faulty or misadjusted. | 6. Refer to Park/Neutral Position Switch. Replace park/neutral position switch if required. | |
| 7. Starter solenoid faulty. | 7. Refer to Starter Motor. Replace starter motor assembly if required. | |
| 8. Starter motor faulty. | 8. If all other starting system components and circuits test OK, replace starter motor. | |
| STARTER ENGAGES, FAILS TO TURN ENGINE. | 1. Battery discharged or faulty. | 1. Refer to Battery. Charge or replace battery if required. |
| 2. Starting circuit wiring faulty. | 2. Refer to 8, Wiring Diagrams. Test and repair starter feed and/or control circuits if required. | |
| 3. Starter motor faulty. | 3. If all other starting system components and circuits test OK, replace starter motor assembly. | |
| 4. Engine seized. | 4. Refer to Engine Diagnosis in the Diagnosis and Testing section of 9, Engine. | |
| STARTER ENGAGES, SPINS OUT BEFORE ENGINE STARTS. | 1. Starter ring gear faulty. | 1. Refer to Starter Motor Removal and Installation. Remove starter motor to inspect starter ring gear. Replace starter ring gear if required. |
| 2. Starter motor faulty. | 2. If all other starting system components and circuits test OK, replace starter motor assembly. | |
| STARTER DOES NOT DISENGAGE. | 1. Starter motor improperly installed. | 1. Refer to Starter Motor Removal and Installation. Tighten starter mounting hardware to correct torque specifications. |
| 2. Starter relay faulty. | 2. The starter relay is located within the TIPM (Totally Integrated Power Module). Refer to “no crank condition” in 9 - Engine - Electrical Diagnosis. | |
| 3. Ignition switch faulty. | 3. Refer to Ignition Switch and Key Lock Cylinder. Replace ignition switch if required. | |
| 4. Starter motor faulty. | 4. If all other starting system components and circuits test OK, replace starter motor. | |
INSPECTION
For complete starter wiring circuit diagrams, refer to 8, Wiring Diagrams. Before removing any unit from starting system for repair or diagnosis, perform the following inspections:
WARNING: On vehicles equipped with airbags, refer to 8, passive restraint systems, before attempting any steering wheel, steering column, or instrument panel component diagnosis or service. Failure to take the proper precautions could result in accidental airbag deployment and possible personal injury.
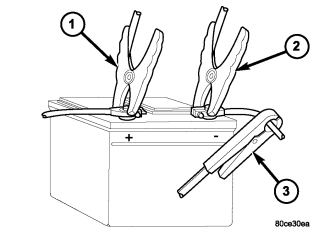
- Battery - Visually inspect battery for indications of physical damage and loose or corroded cable connections. Determine state-of-charge and cranking capacity of battery. Charge or replace battery if required. Refer to Battery in 8, Battery. Note: If equipped with diesel engine, a dual battery system may be used, and both batteries must be inspected.
- Ignition Switch - Visually inspect ignition switch for indications of physical damage and loose or corroded wire harness connections. Refer to Ignition Switch and Key Lock Cylinder.
- Clutch Pedal Position Switch - If equipped with manual transmission, visually inspect clutch pedal position switch for indications of physical damage and loose or corroded wire harness connections. Refer to Clutch Pedal Position Switch in 6, Clutch.
- Park/Neutral Position Switch - If equipped with automatic transmission, visually inspect park/neutral position switch for indications of physical damage and loose or corroded wire harness connections. Refer to Park/Neutral Position Switch in 21, Transmission.
- Starter Relay - The starter relay is located within the TIPM (Totally Integrated Power Module). Refer to “no crank condition” in 9 - Engine - Electrical Diagnosis.
- Starter Motor - Visually inspect starter motor for indications of physical damage and loose or corroded wire harness connections.
- Starter Solenoid - Visually inspect starter solenoid for indications of physical damage and loose or corroded wire harness connections.
- Wiring - Visually inspect wire harnesses for damage. Repair or replace any faulty wiring, as required. Refer to 8, Wiring Diagrams.
TESTING
COLD CRANKING TEST
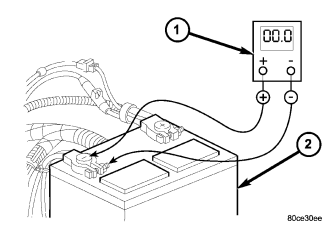
NOTE: For complete starter wiring circuit diagrams, refer to 8, Wiring Diagrams. The battery must be fully-charged and load-tested before proceeding. Refer to Battery in 8, Battery.
Note: Certain diesel equipped models use dual batteries. If equipped with dual battery system, tester should be connected to battery on left side of vehicle only. Also, tester current reading must be taken from positive battery cable lead that connects to starter motor.
WARNING: Attempt to start engine a few times before proceeding with following step.
NOTE: A cold engine will increase starter current (amperage) draw reading, and reduce battery voltage reading.
Starter MotorEngine Diagnosis
Feed Circuit Test
Control Circuit Testing
Feed Circuit Test
FEED CIRCUIT TEST
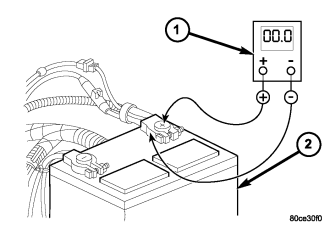
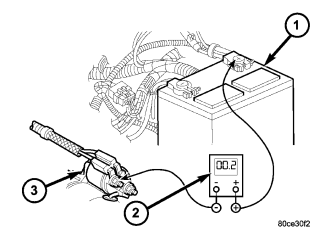
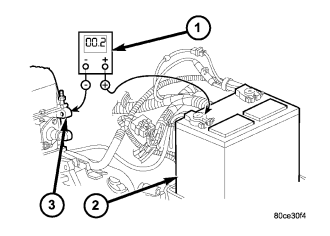
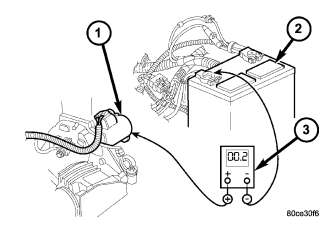
The starter feed circuit test (voltage drop method) will determine if there is excessive resistance in high-amperage feed circuit. For complete starter wiring circuit diagrams, refer 8, Wiring Diagrams.
When performing these tests, it is important to remember that voltage drop is giving an indication of resistance between two points at which voltmeter probes are attached.
Example: When testing resistance of positive battery cable, touch voltmeter leads to positive battery cable clamp and cable connector at starter solenoid. If you probe positive battery terminal post and cable connector at starter solenoid, you are reading combined voltage drop in positive battery cable clamp-to-terminal post connection and positive battery cable.
The following operation will require a voltmeter accurate to 1/10 (0.10) volt. Before performing tests, be certain that following procedures are accomplished:
- Battery is fully-charged and load-tested. Refer to Battery in 8, Battery.
- Fully engage parking brake.
- If equipped with manual transmission, place gearshift selector lever in Neutral position and block clutch pedal in fully depressed position. If equipped with automatic transmission, place gearshift selector lever in Park position.
- Verify that all lamps and accessories are turned off.
- To prevent a gasoline engine from starting, remove Automatic ShutDown (ASD) relay. To prevent a diesel engine from starting, remove Fuel Pump Relay. These relays are located in Power Distribution Center (PDC). Refer to label on PDC cover for relay location.
Note: Certain diesel equipped models use dual batteries. If equipped with dual battery system, procedure must be performed twice, once for each battery.
Note: Certain diesel equipped models use dual batteries. If equipped with dual battery system, this procedure must be performed twice, once for each battery.
Note: Certain diesel equipped models use dual batteries. If equipped with dual battery system, this procedure must be performed on driver side battery only.
If resistance tests detect no feed circuit problems, refer to Starter Motor in the Diagnosis and Testing.
CONTROL CIRCUIT TESTING
The starter control circuit components should be tested in the order in which they are listed, as follows:
- Starter Relay - Refer to Starter Relay The starter relay is located within the TIPM (Totally Integrated Power Module). Refer to “no crank condition” in 9 - Engine - Electrical Diagnosis.
- Starter Solenoid - Refer to Starter Motor Diagnosis and Testing.
- Ignition Switch - Refer to Ignition Switch and Key Lock Cylinder
- Clutch Pedal Position Switch - If equipped with manual transmission, refer to Clutch Pedal Position Switch in 6, Clutch.
- Park/Neutral Position Switch - If equipped with automatic transmission, refer to Park/Neutral Position Switch in 21, Transmission.
- Wire harnesses and connections - Refer to 8, Wiring Diagrams.